How To Build A Car From Scratch

Introduction
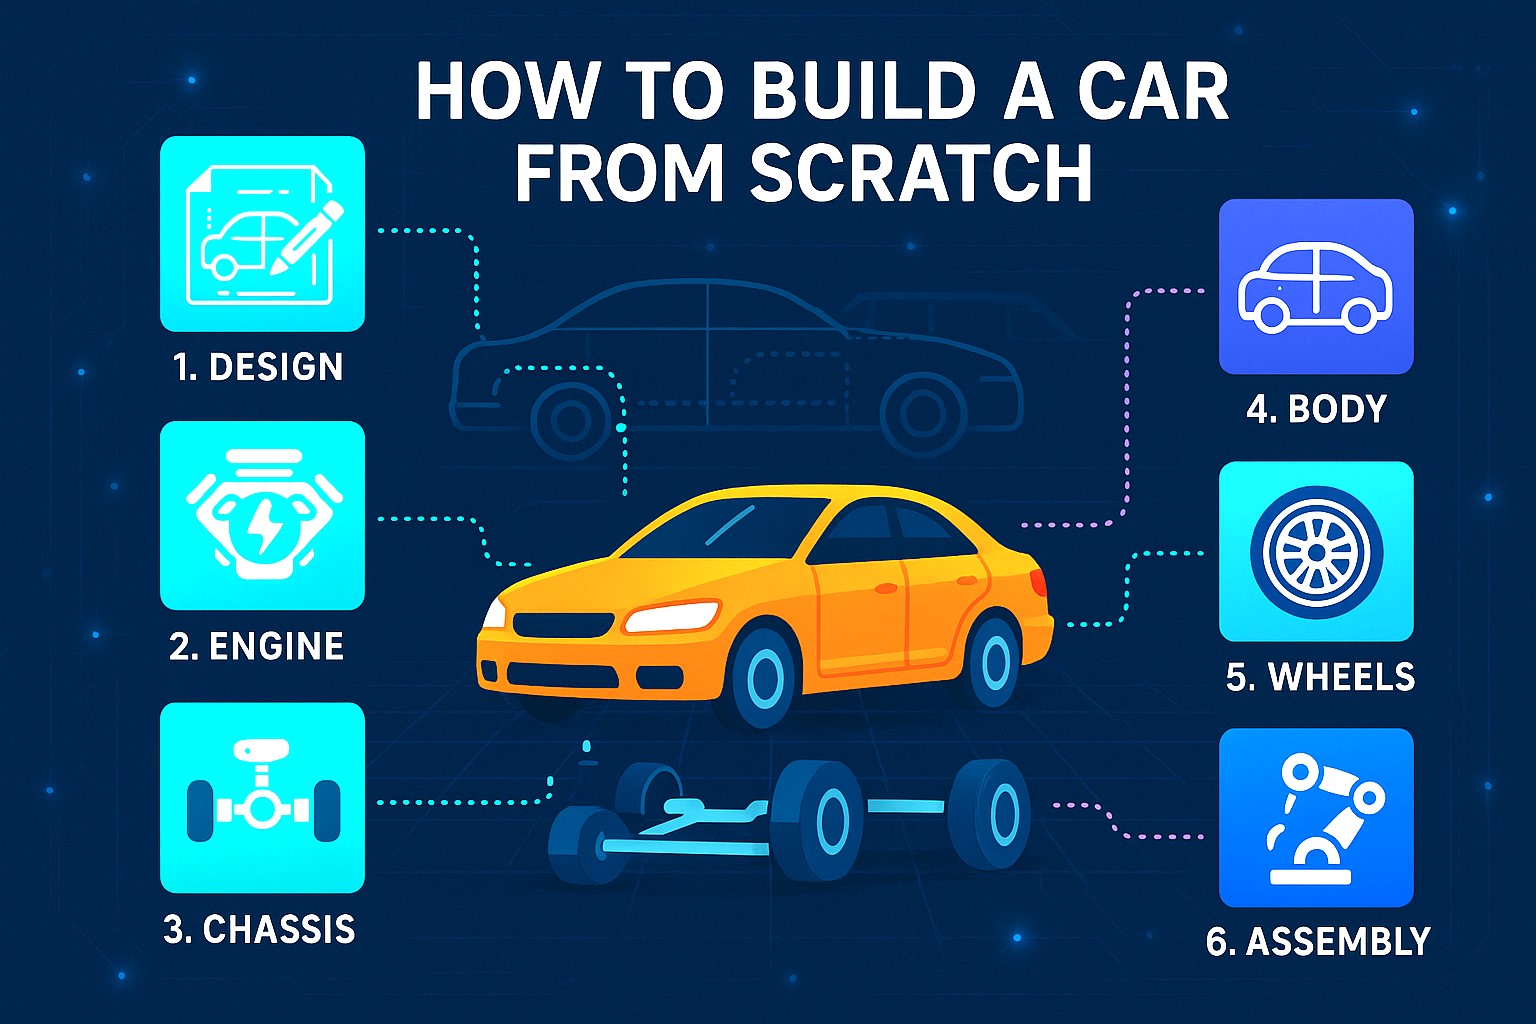
Building a car from scratch is no small feat. It’s a blend of mechanical engineering, design thinking, and hands-on craftsmanship. Whether you’re a car enthusiast or a curious innovator, constructing a vehicle from the ground up requires patience, precision, and planning. This guide outlines each major step involved in building a basic functional car using validated processes and accessible technology. It avoids branded components and focuses on general principles that apply universally.
Step 1: Define Your Car’s Purpose and Specifications
Before any tools come out, you must define your car’s goals. Is it for racing, daily commuting, off-road use, or educational purposes?
Key considerations:
-
Type of car: Coupe, sedan, electric, or kit car.
-
Performance goals: Top speed, acceleration, fuel efficiency.
-
Budget constraints: Costs can range from $3,000 (kit car) to over $50,000 (custom build).
-
Legal compliance: Research local laws regarding homemade vehicles. Most countries require inspections for roadworthiness.
Document these decisions to guide every step going forward.
Step 2: Create the Design and Blueprint
The car’s design is the skeleton of your entire build. At this stage, you’ll create sketches, CAD (Computer-Aided Design) models, and performance simulations.
Tools you’ll need:
-
Free CAD software like FreeCAD or Fusion 360.
-
Aerodynamics simulation tools such as SimScale or Autodesk CFD.
Design components include:
-
Chassis layout
-
Suspension geometry
-
Powertrain placement
-
Interior dimensions
-
Safety considerations (e.g., crash zones, crumple points)
A digital blueprint will help you identify materials, measurements, and fitment challenges in advance.
Step 3: Build or Buy the Chassis
The chassis is the foundation of your car. It supports the engine, drivetrain, and body. You can fabricate your own from steel tubing or repurpose a donor car’s frame.
Materials:
-
Mild steel tubing: Strong and affordable. Ideal for DIY welding.
-
Aluminum: Lightweight but harder to weld and more expensive.
Fabrication steps:
-
Cut and weld frame tubes according to your design.
-
Mount cross-members for engine and transmission support.
-
Attach suspension brackets at accurate angles.
-
Sandblast and paint the finished frame for rust protection.
If you’re using a donor frame, inspect it for cracks or rust before building on it.
Step 4: Source and Install the Engine and Drivetrain
The engine is the heart of your vehicle. Choosing and installing the right one is crucial for performance and reliability.
Engine options:
-
Internal Combustion (Gasoline or Diesel): Widely available, easier for traditional builds.
-
Electric Motor: Cleaner and increasingly affordable, especially from salvaged electric cars.
Installation tips:
-
Mount the engine securely with custom engine mounts if needed.
-
Connect the transmission to the engine and align the driveshaft.
-
Install cooling systems, including the radiator, fans, and coolant lines.
-
Wire the ignition and starter systems, using a custom or aftermarket ECU.
Make sure all components are compatible and properly aligned.
Step 5: Construct the Suspension and Steering System
This step ensures the car can handle roads safely and comfortably.
Suspension options:
-
Double Wishbone: Offers high performance and adjustability.
-
MacPherson Strut: Simpler and widely used.
Steps:
-
Weld suspension arms or install donor suspension parts.
-
Install coilovers or springs with shock absorbers.
-
Attach steering rack, connecting it to the wheels via tie rods.
-
Align wheels for optimal camber, caster, and toe.
Use alignment tools to avoid premature tire wear or unsafe handling.
Step 6: Build or Fit the Body Panels
The car body defines the car’s look and aerodynamic efficiency. You can:
-
Build panels from fiberglass or carbon fiber using molds.
-
Shape aluminum sheets using hand tools and an English wheel.
-
Repurpose panels from donor cars if they fit your frame.
Attach body panels with bolts or rivets. Ensure doors, hoods, and trunks open and close smoothly. Don’t forget to integrate impact zones for safety.
Step 7: Install Wheels, Brakes, and Tires
Your car can’t move—or stop—without a solid wheel and braking system.
Installation steps:
-
Fit hubs and bearings to each wheel.
-
Attach brake rotors and calipers.
-
Install master cylinder, brake lines, and brake fluid reservoir.
-
Mount tires that match your suspension and performance needs.
Ensure the brake system is leak-proof and responsive. Test it before any actual drive.
Step 8: Wire the Electrical Systems
Electrical wiring is one of the most detailed parts of the process. It powers lights, ignition, dashboard instruments, and more.
Components to wire:
-
Battery and alternator
-
Ignition switch and starter motor
-
Lights (headlights, taillights, indicators)
-
Gauges and dashboard
-
Electric windows, locks, or infotainment (optional)
Use a fuse box and relays to protect your systems. Secure all wires neatly to prevent heat or abrasion damage.
Step 9: Interior and Safety Equipment
A car isn’t complete without a functional interior.
Install the following:
-
Seats and seatbelts (securely bolted to the chassis)
-
Steering wheel with column and controls
-
Dashboard and gauges
-
HVAC or ventilation system
-
Carpeting or insulation, if desired for comfort
Use fire-resistant materials and follow ergonomic design for driver comfort and control.
Step 10: Final Assembly and Testing
With all systems installed, it’s time to finish the assembly and conduct testing.
Steps:
-
Tighten all bolts, mounts, and fasteners.
-
Fill up all fluids: oil, coolant, brake fluid, transmission fluid.
-
Check wheel torque, steering movement, and brake response.
-
Perform a static test: Turn on electrical systems, check lights and gauges.
-
Engine start test: Turn over the engine, check RPMs, exhaust, and temperature.
-
Driving test in a closed area to assess handling, braking, and acceleration.
Take notes and fix any issues immediately before moving to public roads.
Step 11: Registration and Roadworthiness Inspection
To legally drive your vehicle, it must pass inspection and be registered.
Prepare:
-
Build log or manual with parts list
-
Proof of parts sourcing (especially engine and frame)
-
Safety features checklist
-
Emission testing (depending on region)
Submit your car for local transportation authority inspection. Once approved, you’ll receive a VIN (Vehicle Identification Number) and license plates.
Conclusion
Building a car from scratch is a rewarding challenge that combines art and engineering. While it requires mechanical knowledge, you don’t need to be a professional to succeed. With the right tools, patience, and research, you can build a car tailored to your vision.
Always remember: safety, precision, and local regulations are key. Take your time, and don’t cut corners. A well-built car not only drives—it inspires.
Key Tips for Success
-
Document every step of your build process.
-
Join car builder forums for support and troubleshooting.
-
Practice welding and wiring on scrap parts first.
-
Start with a kit or donor frame if it’s your first project.
-
Always wear protective gear during fabrication.
🔧 Key Takeaways: How To Build A Car From Scratch
-
Start With a Clear Purpose:
Define the type of car you want to build (e.g., electric, performance, kit) and ensure it aligns with your budget, skills, and local road laws. -
Design is Crucial:
Use CAD software to create detailed blueprints. Simulate performance and identify mechanical challenges before building. -
Build or Modify a Strong Chassis:
The chassis is your structural foundation. Either fabricate one from steel tubing or adapt a donor car frame for your build. -
Choose the Right Powertrain:
Decide between internal combustion or electric motors. Mount your engine, transmission, and drivetrain with precise alignment. -
Install Functional Suspension and Steering:
Build or adapt a suspension system that ensures stability and comfort. Ensure the steering components offer responsive control. -
Craft or Source the Body Panels:
Use fiberglass, aluminum, or donor parts to shape the car body. Make sure it’s aerodynamic, safe, and fits your frame. -
Fit Wheels and Braking Systems Accurately:
Mount wheels with proper hubs, and install a hydraulic brake system. Test thoroughly for safety and reliability. -
Wire All Electrical Systems:
Safely install the battery, fuse box, gauges, lights, and ignition. Ensure all wiring is neat, insulated, and correctly fused. -
Install Interior Essentials:
Fit seats, seatbelts, dashboard controls, and other comfort or safety features. Use fire-resistant and durable materials. -
Test Extensively Before Hitting the Road:
Conduct static and driving tests. Inspect torque, braking, lights, and steering. Only proceed when the car is fully roadworthy. -
Ensure Legal Compliance:
Submit the vehicle for inspection. Keep documentation of parts and assembly to receive registration and plates.
By following these steps with care and attention to detail, you can transform an idea into a functioning car, one bolt at a time.
References
https://en.wikipedia.org/wiki/How_to_Build_a_Car
https://en.wiktionary.org/wiki/from_scratch
Links License – https://en.wikipedia.org/wiki/Wikipedia:Text_of_the_Creative_Commons_Attribution-ShareAlike_4.0_International_License
Dear Friends, warmly welcome you to visit link below. Thanks For Your Support. Cheers !
https://techsavvo.com/category/blog/

